Payments2Us Payments Events
- Jodie Miners
Notes about the Events functionality in Payments2Us, previously known as AAkonsult Payments.
Things to know
- You need to have a different payment form for each "type" of event. Anything that needs a different set of pricing and ticketing options needs a different payment form.
- You may do monthly events that have similar ticketing - you can re-use the same Payment Form. HOWEVER:
- Old event tickets will be shown against the Payment Options forever - this could be confusing.
- If you DELETE Payment Options the pricing recorded on the Payment Item Group is deleted.
- If you CHANGE Payment Option pricing, the pricing recorded on the Payment Item Group changes
- These "features" are not so good - you need to take care using Events.
- You may do monthly events that have similar ticketing - you can re-use the same Payment Form. HOWEVER:
- Each event is managed through Campaigns.
- So you need to have a really good structure for Campaigns, and even set up Campaign record types.
Features
- The person registering can attend or not attend.
- The number of tickets they purchase must have a corresponding number of attendees listed before the registrant can pay.
- NEW! a new feature is out now to override this functionality and allow people to pay for eg a "Table of Ten" up front, then let you know about the attendees in due course. The option is named "Tickets and Optionally Specify Attendees". They do have to submit the details of one attendee for each ticket type. Uprgrade your app to get this new feature
Customising
The standard events forms, like the payment forms are a bit ugly, but there are levels of customisation you can do.
In all of these options, the registration and payment details are only ever stored in Salesforce, and not duplicated on your website.
Basic
- Change the layout of the events form
- Remove parts of the events from
- Change the colour scheme
- add the Events Upcoming list to an iFrame in your website.
- add the Events Calendar to an iFrame in your website.
Custom Theme
- As above but pay the $5/month to have a custom theme.
- This will at least get you square corners instead of rounded.
Custom Website
- Add the events to your website - eg you might have a specific page for each event
- Link the standard payments form to the Register Now button on your events page.
- For extra customisation, if you have a developer handy, add a button in Salesforce on Campaigns to create the event in your website CMS so you don't have to do duplicate data entry.
Custom Registration Form
- Use your own events registration form and use AAkonsult payments form only. Process is as follows:
- Registrant goes to your website, fills in all the details you need clicks register.
- Via the API add all their registration details to a PaymentTxn record in Salesforce with a status of Confirmation - return the ID to your website.
- The website redirects to the payment form, passing in the PaymentTxn ID into the URL of the payment form.
- Registrant pays and the payment goes through AAkonsult.
- For this option you will need to create the following:
- Events on your website matching the Campaign
- Ticketing options on your website matching the ticketing options set up in the Payment Form

Custom Payment Form
- As above, but the payment form is custom also, and AAkonsult is just used to process and store the details of the transaction.
Payment Forms
Say you run a number of events - you have different brands or groups within your organisation, and each group runs different events like Seminars, Workshops and the like. Each seminar and event has different ticketing options. You need to set up a Payment Type for each Event "type".
Using a different payment form for each different type of event has some good and bad points:
Good
- Different payment options per event - eg allow American Express for only some types of events.
- Each event type can have a different set of custom fields - within 6 groups of pre-defined custom fields.
- Each event type can have the following options
- Subscribe to newsletter - and chose a campaign
- You could even have a different Merchant Facility set up for Events than for donations - eg to allow for Invoices to be sent for Events.
Bad
- You have to set up the payment options and card surcharges for each payment form - this could lead to errors.
- There are a lot of options to set up - the help documents to help users to set them up is going to need to be detailed.
- It is not usually the way people think of managing events - they would normally think of having the ticket pricing added to the specific event.
- There are some fields that should never change - eg Opportunity Record Type - and they need to be documented as "Don't touch"
Set up Events to have Invoice Me option
So, you run events, you have people that attend events but their work pays for it. They won't use their own credit card to pay for events, they want an Invoice to be sent to them so that they can send the invoice to their accounts department. When the accounts department gets the invoice, they may choose to pay by EFT or Cheque or even pay by Credit Card - we need to allow them to come back to the registration / payment form to pay by credit card.
This process requires AAkonsult Payments version 3.19 or later. Update from the Appexchange if you have an earlier version.
Process Diagram
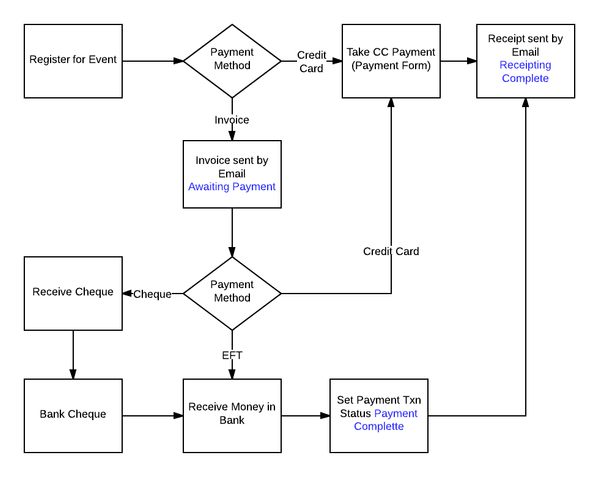
Setup Steps
Merchant Facility
- Choose Invoice Me as well as Credit Card - (I see no need for Cheque or EFT to be used here - they will want a valid Tax Invoice to be issued).
- You may need to create a separate Merchant Facility for Events because you won't want to have Invoice Me for donations (unless you ALWAYS use URL Tokens).
URL Token
Now, we are going to create a special URL Token to use ONLY when they come back to the Payment Form to make a payment by Credit card. At this stage, we don't want to offer them the ability to Invoice Me again. So we use the URL Token to "turn off" that option. With the URL Token you can also turn off:
- The person's details forms - eg so they could not switch out another attendee at that stage, that bypasses your regular "switch attendee" processes
- The transaction details - so they can not change how much they are going to pay.
So set up the URL Token with no other details other than the Payment Method to have Credit Card only chosen. As paying by Credit Card will be the only time they come back to this page then.
Now, when we send the Invoice to the purchaser, we will send them a hyperlink to the Payment form with this URL Token appended. We could hard code this into the formula that generates this hyperlink, but I prefer to have it as a field. So we create a new field on the Payment Form to take the URL Token for Invoice - lookup field to URL Tokens.
Payment Form
- Do not Enter Text into the Invoice field - this is only used for Invoices for Memberships. We will be co-opting the regular receipting process for this Tax Invoice, so the text has to go into the Receipt Text field, but we need to be smart about it and build fields that will work for either Receipt or Invoice - see below.
- Create a new field for Payment Details (Text Area, 255) to store the text of how they should pay the Tax Invoice. We don't want to use any of the standard Payment Details fields because they will need to be used for Direct Debits and other standard features.
- Create the new field for URL Token for Invoice - lookup field to URL Tokens.
Payment Txn
- Make the Email Address field required on the form. (you do this in the Field Set that you chose to use on the Payment Form - there are 10 Field Set options, so you can have different fields for different forms).
- If you change the Field Set on Payment Transaction, remember to also change the corresponding two field sets on Payment Item.
- Also make the Address required, because a Tax Invoice should have an address.
- Note: The address can not be required on the Event Form (I don't know why), but it can be made to be required on the Payment form.
- Also ensure you are asking them for the Company Name or you can even have them to enter the Company Name that will be invoiced if you usually deal with just individuals. (Either re-use the Company Name field and change the label, or add a custom field).
Create a few new fields on the Payment Txn object to handle the Invoice. Receipt or Invoice (Text formula):
IF(TEXT( AAkPay__Status__c ) = "Awaiting Payment",

AAkPay__Payment_Type__r.PaymentDetails__c + BR()
+ HYPERLINK(
IF(ISBLANK( AAkPay__Payment_Type__r.URL_Token_for_Invoice__c ),
AAkPay__Payment_Setting__r.AAkPay__Site_URL__c & "AAkPay__checkout?id="&Id,
AAkPay__Payment_Type__r.URL_Token_for_Invoice__r.AAkPay__Full_Text_URL__c&"&id="& Id)
,"Pay Now by Credit Card", "_blank"),

"Please retain this receipt for your records.")
What does this do:
IF the Status of the Payment Txn is "Awaiting Payment" (eg, an Invoice has been sent),
THEN show the wording of the Payment Details with a URL back to the Payment form so they can pay by Credit Card.
The URL will append the URL Token for Invoice if there is one on the Payment Form.
ELSE, the Status of the Payment Txn is not "Awaiting Payment" so we are sending a Receipt, so we just say a generic line about the receipt, or even leave it blank. (for bonus points, store this text in a custom setting so that users can update it easier than going into formulas).
Payment Form
Receipt Text
Edit the Receipt text to be very generic. Note: depending on how you set up your Receipt Text, this will be done in the Campaign(s) or in the Payment Form. The Campaign overrides the Payment Form.
Include the field:
{{{!AAkPay__Payment_Txn__c.ReceiptOrInvoice__c}}}
in the Receipt Text field
Payment Details
Here's the text I set up in the Payment Details field:
You can pay this invoice to ABCXYZ Pty Ltd in one of three ways:

Cheque
PO Box 999 Suburb XXX 9999

EFT
BankName BSB: 999-999 Account: 9999999

Credit Card
The Credit Card URL will show below the Credit Card heading.
Email Template
Do these steps:
- Edit the standard Payment Receipt template to remove the c: from before PDFReceiptComponent.
- Clone the Payment Receipt template and name it Payment Invoice
- Change all the wording in the email template related to Receipt and make it Invoice or Tax Invoice - you need to replace the fields with hard coded text because we are using the one Payment Form and "PDF Receipt" for both Invoicing and Receipting. (for Bonus Points you could create custom settings to store this text in case the government changes the requirements for Tax Invoices again at a future date (and don't think they won't)).
- Change the component to be the following <AAkPay:PDFReceiptComponent PT="{!RelatedTo}" receiptLabel="TAX INVOICE" suppressStatusUpdate="true"/>
- Remember the AAkPay bit in front - it won't work without it - the invoice will be blank. (Jodie, at your service, stuffing every possible thing up first, so you don't have to).
It will look like this (code about plain text and rich text removed for clarity - it still needs to be there:
<messaging:emailTemplate subject="Tax Invoice for: {!RelatedTo.AAkPay__FirstName__c} {!RelatedTo.AAkPay__LastName__c}, {!RelatedTo.AAkPay__Receipt_No__c}" recipientType="Contact" relatedToType="AAkPay__Payment_Txn__c">

...

Dear {!RelatedTo.AAkPay__FirstName__c},
Thank you for your registration, please find attached your PDF Tax Invoice.
You will need a PDF reader to open or print your Invoice (available free from www.adobe.com).
Kind regards,
{!$Organization.Name}
{!$Organization.Street}
{!$Organization.City} {!$Organization.State} {!$Organization.PostalCode}
{!$Organization.Country}
P: {!$Organization.Phone}
F: {!$Organization.Fax}

...

<messaging:attachment renderAs="PDF" filename="Tax Invoice - {!RelatedTo.AAkPay__Receipt_No__c}.pdf">

<AAkPay:PDFReceiptComponent PT="{!RelatedTo}" receiptLabel="TAX INVOICE" suppressStatusUpdate="true"/>
(for bonus points, change the email subject to be the Company Name field if they need to be invoiced to a specific Company).
Change the wording of the email to suit what you want for your registration process. Eg, you may say something like, "Entry to the event is not guaranteed until you receive a confirmation from us, after we have received payment." Be very careful that there is nothing on this invoice that indicates that they have paid for a ticket. I would also put this text in the Receipt or Invoice field if it is critical for your business process.
Create a workflow on Payment Txn
Clone existing Send Receipt Automatic.
- Name = Send Invoice - Automatic
- Evaluation = Evaluate the rule when a record is created, and any time it’s edited to subsequently meet criteria
- Criteria = (Payment Txn: Status EQUALS Awaiting Payment) AND (Payment Txn: Record Type NOT EQUAL TO Auth,Refund,Shopping Cart) AND (Payment Txn: Send Receipt EQUALS Yes - PDF Version)
- Workflow Actions
- Task to say that the PDF Invoice has been sent.
- Email Alert to Send the PDF Invoice - using the Payment Invoice Email Template you just created
- Field Update to update the Payment Source field to "Credit Card"
- This last step is important, because if they come back to the Payment form, to try to pay by Credit Card the Credit Card fields will not be visible unless the Payment Source = Credit Card.
TEST
TEST! TEST! TEST!
Process
- Keep an eye on the Awaiting Payment view, or create reminder workflows after a few days or X days before the event to chase up payments.
Credit Card
- If the Payment is made by Credit Card, there is nothing more to do - it will just be the same as someone registering for your event and paying by credit card.
Cheque
- When the cheque comes in, set the Status on Payment Txn to be "Payment Complete". This will automate the receipting process.
- Now, beware - your accountant may have something to say about this - check it with them - what happens if the cheque bounces. You may not want to issue a receipt (especially if there is a donation component and you have DGR status) without the cheque clearing. You may need to create an interim stage of Cheque Received, and come back manually and set as Payment Complete when the cheque clears.
EFT
- When the money is received in your bank, set the Status on Payment Txn to be "Payment Complete"
I hope that's it. I hope that works for you. Let me know!
Gotchas
This is a lot of work and is a bit of hack, so if anything changes in the way AAkPayments works, you may need to re-jig your process. I would love AAk to do this as a real option, using existing Invoice fields.
If you have a situation where you also take donations on top of events payments, AND you want to use suggested amounts, when you click on the hyperlink to pay by Credit Card after issuing the Tax Invoice, the donation amount will not be there. There is a workaround to this, but it is such a hack and there are so many steps, it is probably not worth it. Hopefully this weird scenario will be fixed in a future release. For now, just turn off suggested amounts, and it will work.