Recent Views
- Jodie Miners
Overview
This is the steps to modify the Tab Views that first display when you click on the Tab. Mostly people will use the views in the View menu, and favourite them in their browser, but you should edit the Recent Items Views for each object when you set it up.
Recent Views vs Recently Viewed Accounts/Cases/Contacts/Leads Views
In the main objects, there is a view in the views list called Recently Viewed Accounts (or the object you are on). You CAN NOT edit that one. Weird, I know - see here https://success.salesforce.com/ideaview?id=08730000000BpRoAAK. I reckon a fix will be coming soon, but in the meantime it's a pain.
Be Aware
Recent Views (and especially Recently Viewed views), can NOT be modified to show different views to different users. Eg if you have a Partner Community and give them access to their own Accounts or Contacts, then they can see the same fields as internal users (unless of course the field has the security set correctly.
Be careful with this.
Basic Steps
- Decide on the maximum of 10 columns you want in your Recent Items views for each object
- Add that list of columns to your documentation - you will refer to it often. See Views.
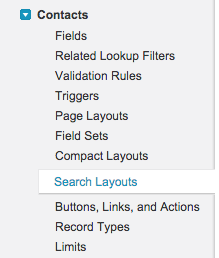
- Go to Search Layouts for the object you want to change
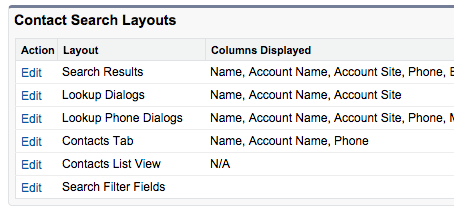
- Click the Edit next to the Tab for that object - eg Contacts Tab
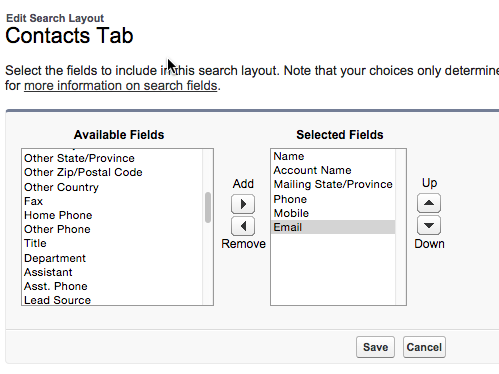
- Add the fields you want, and put them in the right order, click Save
Record Type
If your object has Record Types, be sure to include the Record Type in each view. This will help with Bulk Editing.
- The view is now updated.

Advanced
In Mavens Mate, in the Contact.Object file, look for
<customTabListAdditionalFields>FULL_NAME</customTabListAdditionalFields>
under searchLayouts
Add any other fields you want in there, in the same format, eg
<customTabListAdditionalFields>Languages__c</customTabListAdditionalFields>
<customTabListAdditionalFields>Level__c</customTabListAdditionalFields>
Note: Custom fields don't have the "CONTACT." in front of the field name.
Save the file, which will compile and then update your list.
Magic!
Next Steps
- Whilst you are here set the Search Layouts too
See Also
On this Site
Other Sites
- Simply Salesforce.com: How to modify columns in Recent Object view?
- Simply Salesforce.com: Salesforce: Modify default View in Object Tab