Versions Compared

Key

  • This line was added.
  • This line was removed.
  • Formatting was changed.

A while back I created a page for MavensMate and Git for Non Developers. Now that MavensMate is dead (RIP) and VSCode is now the official IDE for Salesforce development it is time to start learning VS Code. (Also see Following the SFDX Trailhead Trails for how I did trying to learn SFDX which prompted me to start with this page first). 

...

Table of Content Zone
locationtop

About the Tools

A note about Git

Git is a bit different than Github. Git is very techy and is usually used from the command line by issuing text commands. I use SourceTree because it is not very techy and is not that much different than using a simple text diff tool, and a backup tool (well the way I use it anyway). I know that I could learn much more and use git and SourceTree in a much better way, but for the purposes of this article you really don't need to know much about git... we are just using SourceTree and BitBucket to save your Salesforce Configuration.

You will still want to have a Github account (yes, I have one), even if it is only to make bug submissions or share Gists. (Gists are pretty cool, and they can even be secret - well not show up in the main Github search, anyway). 

In this article I am not covering anything about branches and pull requests and merging. You can delve into that in your own time - and it may be useful if you work with a team. There are a few great git tutorials eg https://www.atlassian.com/git/tutorial and and http://try.github.com/ and http://pcottle.github.io/learnGitBranching/. For our purposes in this article, commit is the same as backup (smile)

Github is the tool that Salesforce DevOps Center will use from the beginning so it is a great idea to get started on Github now. And they now have free Private Repos so you can save your metadata in there. 

VS Code

Visual Studio Code is by the new improved, open, Microsoft. It's free. It's an IDE which is just a text editor with a few extra features in it. We won't be using many of the IDE features at this stage. One of the coolest things that you can do with an IDE is set it up exactly how you want it. Black or White backgrounds, different colour fonts, different icons etc. I like this site https://vscodecandothat.com/ that shows you some of the cool things you can do. 

BitBucket

Bitbucket is a tool that can host git repositories. Really the only thing you need to know about it right now is that it is similar to Github in many ways, but it has free private repositories. That means you can store your Salesforce configuration in the cloud and it is password protected. If it's on github it's going to be visible to the world, and that may not be good for your organisation. You can pay US$7/month (Now FREE!) and get private repositories on Github and do similar things - the choice is yours. Bitbucket is made by the Australian founded company, Atlassian, who also make Confluence, the fabulous tool you are reading this article on right now. Oh, and the other cool thing you can do with Bitbucket is sharing - so if you have a few in your team, you can share your repositories. 

SourceTree

SourceTree is another app by Atlassian. Yep, I know I could get really techy and use Git via the command line, but hey, we are not devs here, and we just want to do things simply, so Source Tree is a great tool to do this job. 

Powershell

So, you know the CMD prompt in Windows, well Powershell does all that but with a lot more features. We are not going to delve into the features but we are going to start with using Powershell so it's there for the future. And the good news is, you don't have to install it. Powershell is already installed in Windows 10. One of the coolest things it does for me is that it allows me to use the unix commands I have tucked away in my brain - eg instead of doing DIR at the command prompt, I can use DIR or ls in Powershell. ls or list is the unix equivalent to DIR. Here's a list of basic Powershell commands

Tools you don't need

If you've heard of any of these tools or buzzwords then try and ignore them, because we are not going to get involved with them. And if anyone tells you you need them, again tweet me because I want to know WHY!

  • Bash
  • PuTTY
  • SSH
  • Linux or Windows Subsystem for Linux
  • NPM or Node

(Well, I do use SSH because my Bitbucket is set up to use the higher level of authentication, but I'm going to try to set up a brand new Bitbucket so I can show you without all that). 

Other Tools I've Tried

I miss the good old days of MavensMate where I could

  • Download the whole org's Metadata (well mostly)
  • Back it up on Bitbucket
  • Make simple changes to fields or page layouts and save the file and it would save directly back to PROD! (Yes, of course, you do most changes in Sandbox, but just to fill in Help Text or descriptions on bulk fields, it's so quick and easy).
  • Or when setting up a new org or bulk fields just build the XML then save it to prod in one step (then set the perms manually).

I tried Illuminated Cloud and I just found it so difficult to use. I know I could probably get used to using it if I was doing actual development for real, but there are just far too many menus that you don't use.

I tried The Welkin Suite but it was just too weird and too far away from regular Salesforce for my liking. 

For just searching through your Metadata I have tried the free version of Salto.io and it is pretty good, but the paid version with all the writeback features is really exy. 

To CLI or to not CLI

That is the question. Now this one is up to you. What we are NOT going to go through here is the many versions of the Salesforce CLI and how to use all the commands. I just get lost in a sea of words when I use the CLI. So I'm going to use the IDE mainly, and then a few simple commands via the Terminal within the IDE when it's easier. You may find that it's easier and quicker to type commands rather than using the IDE menus after a while. Do NOT let anyone tell you that using the CLI is the only way to go and you are not a real developer if you use the menu commands. Tell them to talk to me if they do! If you really want to delve into the Salesforce CLI, start with this video series from Salesforce Weekly. But don't go there yet! Only after you are very comfortable with your environment. 

Installing the Tools

See Installing the Dev Tools

Download the Metadata

The old guide has been removed and they say to use Trailhead, but I find Trailhead too cumbersome and filled with unnecessary guff. Here's the Trailhead Module, but come back here as soon as you get confused. 

Create the Project

  • Open VS Code
    • Close the Welcome page
  • Open the command pallet - ctrl+shift+p and start typing SFDX: Create Project with Manifest
    • Enter the project name - don't just press enter like I did. (And don't navigate away from VS Code or you will lose the prompt). 
    • Choose where the project will go - C:/Users/JodieM/Dropbox/Code
    • Click Create Project. 
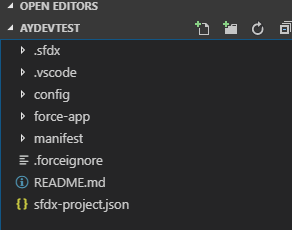
  • The result will look something like this (but with a different name, and now new folders - wtf is .husky?)

  •  What's in this folder
    • the .sfdx folder for all the sfdx related folders
    • the .vscode folder for all the settings related to vscode. 
    • the config folder which is the configuration file for the sfdx org - we won't use that for now. 
    • the force-app folder which is where all your sfdx metadata goes. 
    • the manifest folder containing a package.xml file. 
    • .forceignore is telling sfdx which folders or files to ignore because they are not part of sfdx - at the moment it's just package.xml
    • README.md - the readme file
    • sfdx-project.json - all the settings for this project. 
  • Package.xml
    • This is the file that tells the Salesforce Metadata API which metadata to download. The file is very basic with just asking to download VF Pages, Tests, Triggers and Code. We want MORE!

Set up Git

Now that we have our basic project structure we are going to set up git, set up our Github Remote and save the basic structure to Github. I find these steps easier to do via the command line as we need to do them with every project (if anyone has a simpler step by step let me know).

  • Open the Terminal ctrl+shift+`(backtick)
  • Type git init and enter
    • This initiates our folder as a git repository locally on our machine 
  • You may want to modify your gitignore - look for a folder named .gitignore
    • Open the file and enter the following under .sfdx
      .vscode
    • Save the file and close it. 
    • Or you can click on the folder and choose the command Git: Add File to .gitignore from the Command Palette (that didn't work for me second time around). 
    • Or you can copy and paste a .git ignore in from another folder with all the settings you like to have
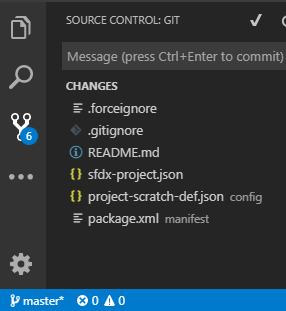
  • At this stage if you click the Git icon in the Activity bar you will see the changes that have been made, and you will see in the status bar that we are in branch master*. Remember this is just on our local machine and we are not connected to Github yet. 
    • I had to save my git email and name which marks my git changes with my name. I had to run two commands to do that.  
  • In the status bar it tells you your Git Status 
    • master with a * says we have changes that have been made and not committed. 

  • There are two ways to do this, via code
    • Type git add -A which stages all our changes ready to commit. 
      • master now shows as master+ which means our changes are staged and ready to commit. 
    • git commit -m 'first commit'
      • This commits the changes
    • Grab the git remote add command from Bitbucket when you set up the repository. Enter that at the terminal 
  • Or via the UI
    • Or open Source Control, type a message, and click the checkmark icon. The code is now committed (locally)
    • Click Publish Branch, this will sign you into Github
      • Make sure you finish the sign in process - the window might get hidden.
    • Choose Publish to Github private repository
    • wait a bit, then the Repo is in the cloud in Github

Now the status bar shows a cloud next to master

Github

Now go to Github.com and go to your repositories and see the same folder structure as is in your VS Code, now in Github. 

(Optional) Source Tree

Skip this if you are using Github.

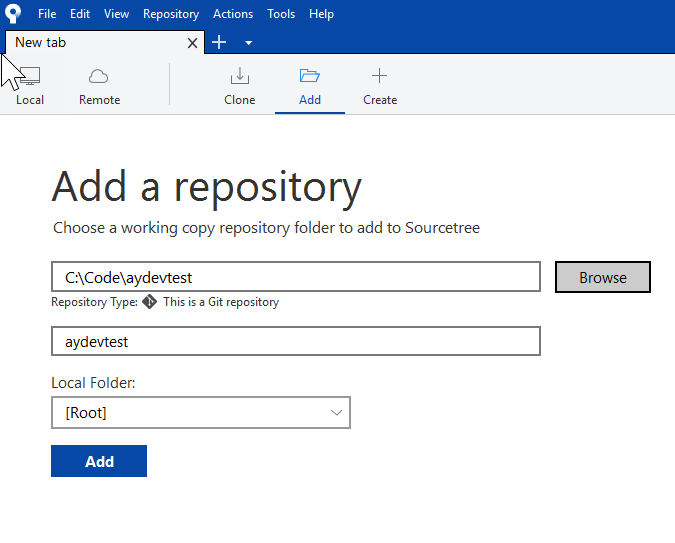
  • Now it's a good time to go to Source Tree and set it up so you can see graphically what Git is doing. 
  • Add a repository

  • And the files you previously committed in VS Code are there in a branch named Master. 
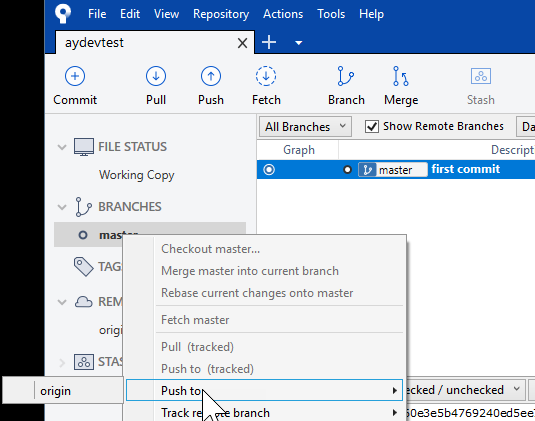
  • We will now push the master to the remote to back it up in Bitbucket. 

  • At this stage you will need to enter your Bitbucket login and password. 
  • Open Bitbucket to see the contents of your project safely tucked away in the cloud in a private repository. Cool!
    • Note that the .vscode and .sfdx folders are not in Bitbucket because we added them to .gitignore - we don't need those tracked. 
  • Now back in VS Code our status bar has no cloud, and our Git panel has no changes. 

Connect to the Org 

It is surprising but at this stage you are not even connected to Salesforce - up to now was all about just getting your environment set up and working. Now we can connect to Salesforce. 

  • From the Command Pallet choose SFDX: Authorize an Org
    • Choose where to log into (eg Test for Sandbox, Production for Dev Org)
    • Enter the Org Alias
  • The Web browser will open and you will log into your sandbox as you would normally. 
  • Close the browser and come back to VS Code.
  • At the terminal type sfdx force:org:list to list the orgs you are connected to. 
    • Or choose SFDX: List all Aliases in the Command Palette

The status bar shows the Org Alias that you are connected to. 

Image Modified

Retrieve the Basic Metadata from the Org

Our project has some basic files in it in the force-app folder

  • Right click on the Package.xml files and choose SFDX: Retrieve Source in Manifest from Org
  • Now the force-app folder has the contents from the Package.xml

Save to your Repo

This step is optional but we are just getting used to committing often and when major changes have been made to our project

Save to Github

Save to Bitbucket

  • Open Source Tree 
  • Click Stage All
  • Commit and Push changes immediately to origin/master

Image Removed

  • Open Bitbucket and check that all your code is now safely tucked away. Cool!

Now for the rest

See Org Browser and Package.xml for more details on what to do next to download your metadata. 

After you have the new package.xml file: 

  • Select all the contents of your new package.xml file and replace the contents of the package.xml folder in your VS Code project. Ctr+s to Save. 
  • Right click SFDX: Retrieve Source in Manifest from Org
  • Wait quite a while
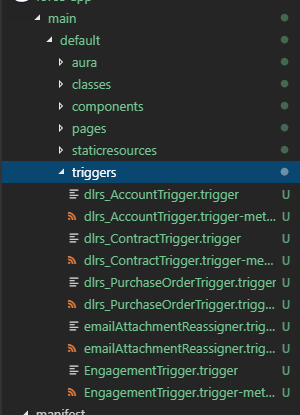
  • You will start to see the numbers in your git icon increase and the folders in your force-app folder increase and turn green. 
  • Now open Source Tree, Stage All files, Commit and push all changes immediately to origin/master with a commit message of 'Full Org Metadata'. Again it will take a while. 

NOTE: For me this is where Source Tree shat itself and kept going into Non Responding mode. I'm not sure if it would be easier just to try this bit from the command line.  

Warning
titleA note about JAVA

JAVA sucks, it always has, (do I need the JDK, the JRE, which version, where do I get it, how do I set Environment Variables etc etc etc) and now it's gotten even worse becuase Oracle has changed something (Google it), and now you need to use a different source of Java. As Salesforce does, there are silos and they don't talk to each other. The current state of play as I write (and it probably will change right away) is that Dataloader requires Zeus Java and VSCode tools still say just download Java. This twitter thread shows some other options but it's still clear as mud. OK. Just be warned. 

You need Java installed to do Apex stuff in VSCode, not regular Metadata stuff. 

End Result

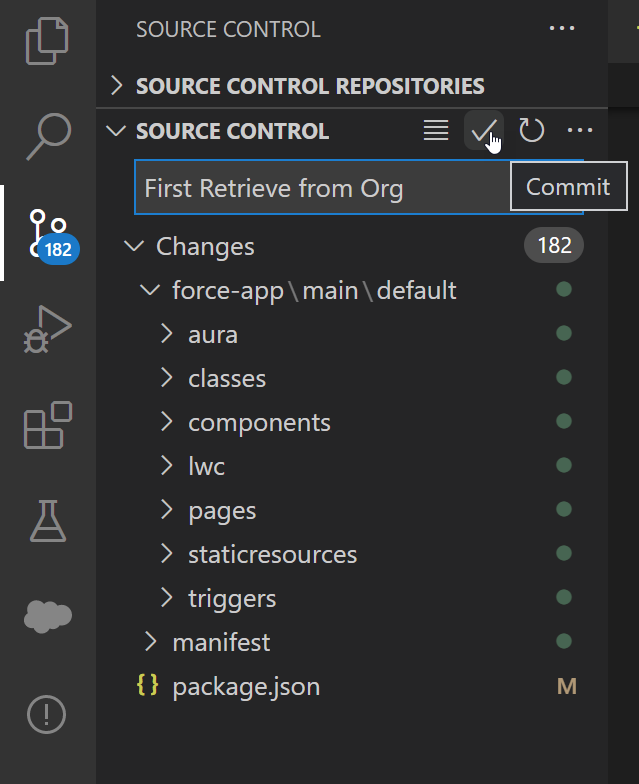
  • All your source code is backed up in Bitbucket in a private repository. You Click on Source Control 
    • You will see all the updated files that need to be saved to your Github
  • Enter a message in Commit
  • Click the checkmark to Commit

Image Added

  • It will ask you to Stage Changes, click Yes
  • The Code will be committed (locally). 

The status bar will show you are one commit behind - that is there is one commit made locally that has not been saved up to the cloud in Github

Image Added

  • Click Sync Changes and OK
  • This will save the metadata from your Salesforce Org to Github. 

Save to Bitbucket

  • Open Source Tree 
  • Click Stage All
  • Commit and Push changes immediately to origin/master

Image Added

  • Open Bitbucket and check that all your code is now safely tucked away. Cool!

Now for the rest

See Org Browser and Package.xml for more details on what to do next to download your metadata. 

After you have the new package.xml file: 

  • Select all the contents of your new package.xml file and replace the contents of the package.xml folder in your VS Code project. Ctr+s to Save. 
  • Right click SFDX: Retrieve Source in Manifest from Org
  • Wait quite a while
  • You will start to see the numbers in your git icon increase and the folders in your force-app folder increase and turn green. 
  • Now open Source Tree or Git, Stage All files, Commit and push all changes immediately to origin/master with a commit message of 'Full Org Metadata'. Again it will take a while. 

End Result

  • All your source code is backed up in Bitbucket or Github in a private repository. You can now sleep at night. 

Now, I must tell you that using the Chrome Extension Salesforce Inspector you can download your key metadata into a zip file and then save that in your dropbox folder, but that was not the point of this exercise, was it. No, I like to have the full IDE set up so that I can start to delve into modifying the metadata locally and deploying it, or testing scratch org stuff. 

Of course there will be easier ways of doing this. I've tried to use some command line, some IDE and some visual apps. So here's your challenge - share with me a Gist with just the CLI commands to do all of this step by step. That will help me, and others learn how to get to the next step of productivity. 

Next Steps

  • Tricks to searching metadata.
  • Bulk changes to metadata - eg find and replace - helpful for Help Text when a business rule has changed. 
  • Making changes and deploying a small subset of code. 

Github

I was finally able to test using Github, and it is nice and easy. Now that Github has free Private repositories, it is safe to use (well don't go storing your API keys in there). I think Bitbucket is just as easy to use, but my Bitbucket is set up to use SSL and with Github I could just use HTTPS login. (But for real code, SSL is probably better). Also, I'm attempting to do this project without a UI, but I know I can still use Sourcetree or Git Fork if I want to. 

Steps were:

  • Create the repository in Github
  • Follow the steps on the home page of the repository which includes
  • Init Git in your folder - git init
  • Stage Changes
  • Commit
  • Add the Github Remote - git remote add origin https://github.com/YourName/YourRepo.git
  • Push local to the Remote - git push -u origin master

    Next Steps

    • Tricks to searching metadata.
    • Bulk changes to metadata - eg find and replace - helpful for Help Text when a business rule has changed. 
    • Making changes and deploying a small subset of code. 

    Things to Know

    Security

    Be careful just logging into all sorts of sandboxes as the login credentials are stored on your PC, and anyone who gets access to your PC can log in again without using a password. This may not be an issue for a Dev Sandbox, but it would be for a Partial or Full Sandbox. At this stage there is no way to disconnect an org. I found this blog post (excuse the horrible gifs) to explain how to remove them. 

    Use sfdx force:org:list to check that you are no longer connected after you delete the files. 

    For Developers

    The start of a list of resources for getting using VS Code, SFDX for developers

    Filter by label (Content by label)
    showLabelsfalse
    max30
    showSpacefalse
    sorttitle
    cqllabel = "sfdx" and space = currentSpace ( )

    You are going to a cheat sheet of your favourite DX commands. Try these

    Filter by label (Content by label)
    showLabelsfalse
    showSpacefalse
    sorttitle
    cqllabel = "dxcmd"

    ...